![]() ...to
Plywood Boats or to The
Cheap Page or to The
Odd Sails or Short
Boats
...to
Plywood Boats or to The
Cheap Page or to The
Odd Sails or Short
Boats
|
|
|
|
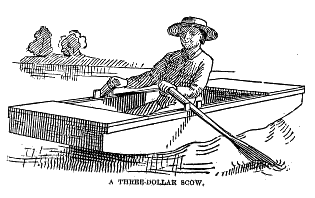
June 17, 1876. |
|
|
|
|
|
|
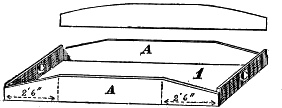
Procure eight or nine boards of 3/4 inch pine 8 or 10 inches
wide ; one pine board 1 inch thick and medium width ; a pound of five
penny nails, and half a pound of same sized wrought nails. Plane the
boards on both sides and both edges. Select two of the clearest and
best boards, 10 inches wide. Saw them 10 ft. long making square ends of
course. Then taper the ends down to 4 inches wide, making the shape
shown in Figure 1. Round off the edges at the beginning of the tapering
section, giving the form of diagram above Figure 1. |
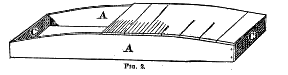
The curves should be gradual, and exactly the same on both boards. Saw out two other pieces, each 4.5 inches wide, 1 inch thick, and 2 ft. 10.5 inches long. These are the end pieces. |
||
|
|
|
|
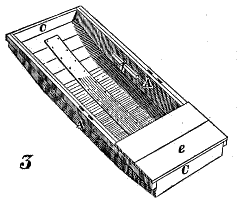
After covering the whole bottom in this manner cut two strips each 10 ft. long 1.5 inches wide, and 1 inch thick. At 4 ft. 5 inches from one end of each strip cut a notch on the side, 0.5 inch deep and 1.5 inches long; and 3 inches from this notch, or 4 ft. 8 inches measuring from the same end, cut another same size. Turn the boat over and nail these strips on the upper edges of the side boards, Figure 3, on the outside of the same, with the notches inside. Use clinched wrought nails a foot apart. The mortises so formed are the rowlocks, hence those on one side must be opposite those on the other. Near the rowlocks the strips must be more securely fastened than elsewhere. The end of the scow nearer the rowlocks will hereafter be called the stern. |
||
|
|
|
Place a 3/4 inch board in the middle of the bottom inside (Fig 3); bend it down against the bottom, and nail through the bottom boards into it, where the dots in the diagram indicate, two wrought nails in each bottom board, clinched inside. This board will hereafter be known as the long bottom board. Place two boards crosswise, 3 ft. 2 inches long, at e, Figure 3, and nail them to the edges of the side boards. The opposite end of the boat is covered in the same manner. |
Nail a cleat about a foot long on each side of the boat inside, at f, Figure 3, with its aft end 5 ft. 4 inches from the stern, and its upper edge 6.5 inches below the edge of the side board. These cleats should be fastened with clinched wrought nails; they are to support the seat board, which is 2 ft. 10.5 inches long. |
||
 |
|
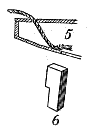
Bore a 3/4 inch hole in the bow seat, through it run the end of a small rope, and knot it inside (Figure 5). This rope is called the "painter". It should be about 10 ft. long. Make four oak tholepins (Fig 6) 0.5 inch thick, 4 inches long, 1.5 inches wide, with a shoulder projecting over about an inch. Fit them into the mortises to complete the rowlocks. |
Wedge cotton evenly into all the seams and cracks on the outside of the boat, except the end seats, leaving space above the cotton at least 1/8 inch deep. Then fill the seams, and cover all the nail heads with putty. If the builder is a good carpenter, he can fit the joints so closely that no caulking will be necessary; thick paint, daubed into the cracks as the pieces are nailed together, being sufficient. A better method than caulking for this kind of boat, even if the joints are not neat, is to lay a strip of thick flannel, 3/4 in wide, saturated with paint, between the pieces as they are put together. This strip must be placed in every seam that can be seen on the outside of the boat. |
||
|
|
||
1.0 03/15/99

..